
You opened registration and people are signing up—awesome. Now comes the operational question: where do you find your participant list, and how do you view everything you’ll need for race day and beyond (t-shirt size, DOB/age, waiver, add-ons, bibs, payments, and more)?
In the RunSignup, all of that lives in your Participant Report, which you can view, search, customize, edit, save, and download right from your Race Dashboard.
How to Find Your Participant List
- Go to your RunSignup Race Dashboard
- Navigate from your Race Dashboard to Participants >> View Participants
By default, you’ll see a participant report with key details like name, event, registration date, age, gender, email, giveaway/t-shirt size (if collected), amount paid/fees, and quick buttons to manage registrations.

Note: The default view does not show every possible field for your race. If you need more info (custom questions, add-ons, teams, waiver status, etc.), you’ll want to customize the columns.
How to Customize What Info Shows (Add the Columns You Actually Need)
At the top of the report, select Report Options. From there, you can can control exactly what appears in your participant list.

Option A: Customize View (quick column selection):
- Click Customize View
- Choose the fields (columns) you want to include
- Click Update Report to apply changes

Option B: Pick Fom All Columns (full “everything” list):
If you’re trying to pull very specific details (like custom questions or less common fields), click the Pick From All Columns tab. This shows all available columns for your race so you can build the exact report you need.
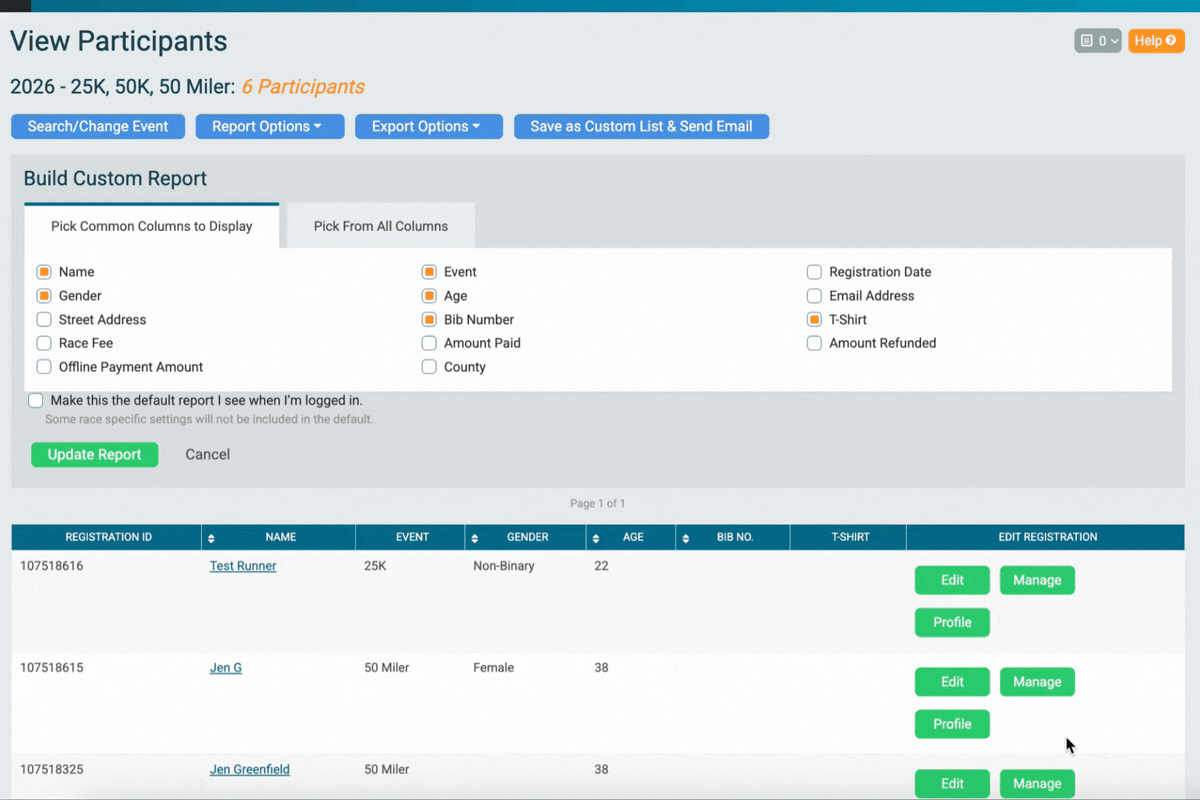
Examples of what column organizers commonly add:
- Giveaway/t-shirt size or other giveaway selection
- Custom question response
- Add-ons
- Bib number
- Address fields
- Waiver Status
How to Search and Filter Participants (So You’re Not Scrolling Forever)
At the top of the View Participants page, click the Search/Change Event button to narrow your list. You can filter by things like:
- Event (great if you have multiple distances)
- Name
- Bib Number
- Gender
- Fundraiser
- Team

After setting filters, make sure you click Update Report so the report refreshers with your selections
How to Edit a Participant’s Registration From the List
Need to fix a typo, resend a confirmation, move someone to a different event, or review what they purchased? This is also where you can quickly help a participant if they email with a question—like whether their registration went through, what giveaway size they selected, or if they added on merchandise or donations. Instead of hunting through multiple pages, you can handle most common changes from the participant list.
On the far right of each participant row, you’ll see action buttons (commonly Edit and/or Manage depending on your permissions and setup). Those tools let you jump directly into that participant’s registration to make updates as needed.

Edit Options

Manage Options
How to Download Your Participant List
Once your report is showing the right columns (and filters), you can export it by clicking Export Options.

Final Tip: Save Your “Go-To” Report Layout
If you find yourself building the same report view repeatedly (i.e., a “Packet Pickup” report with bib, giveaway, and DOB), it’s worth setting up that column view once and using it as your standard workflow —especially as registrations grow.
Learn More
Have questions? Check out these recourses to help or reach out to your RunSignup account manager or email info@runsignup.com
